We’re taking things slow this time
Step One: How not to make a needle
By the Tudor age, the time of bone and copper needles had given way to iron and steel for sewing. Pinners probably did not make needles, but since we’re on the subject of sewing sharps, it behooves us to take a moment to consider the unblinking eye of a needle.
This plays into the larger arc of pinning because the next step to be explored is the correct way to hold the bone, the wire being sharpened, and to experiment with the tools to see if we can replicate the tool marks we found in the extant pinner’s bones.
Unfortunately, this requires a little bit of metalworking, which has been my achilles heel all along.
Full disclosure: I am not generally a metalworker, nor would I ever consider myself a blacksmith. I have never aspired to become a blacksmith. I know how not to hurt myself and how to use the safety equipment and I know somewhat about the metallurgy of smithing. I took some pretty involved metalworking classes in high school and I even made a sword (the principal got quite cross and took it away, but I got it back and received an A on the project, for the record). The class curriculum was devoted to sheet metal, welding, and sandcasting; my sword was a stock-removal sort of affair, not a forged-from-a-billet sort of thing. Industrial arts, to be sure, but not qualifications for setting up shop neath a spreading chestnut tree.
Which leads us to part 1a of our farce, in which we channel René Magritte and fail utterly to make a steel needle.
Ceci n’est pas une enclume
Determined to make a steel needle in as close to the Tudor manner as possible, I set up a very simple forge. I had a torch for heat, a tray of sand for a heating ground, and what passes for an anvil in this household. For material, I had steel music wire. I purchased the wire rather than drawing it myself because, let’s be honest, that’s what a Tudor metalsmith would do.
So about that anvil… let’s just say, it is not really an anvil. In blacksmithing circles it’s what most smiths would sniffingly refer to as an ASO, an “Anvil Shaped Object”. Purchased with a coupon from Harbor Freight, it is shaped like an anvil, but it isn’t made from steel, but rather was cast from iron. And the finish on the thing is terrible. It’s painted where it should be bare and big, deep, grinding marks mar the surface meant for striking.
It does its job (mostly) but because it’s iron, heat management is key. When the steel cooled too much, the hammer drives the harder steel into the softer iron of the anvil.

Swearing happened.
We’re going to have an absolute blast when we get to the worshipful company of ironmongers, I can tell you¹.
Not being a metalsmith, I foolishly thought annealing my steel, punching a hole with an appropriately-sized punch, and then hardening it. Sounds like a dawdle.


It was not. I heat the wire to orange, flatten the eye, attempt to punch the eye and… it all goes to hell. I don’t know if I need a smaller punch, a different punch, or maybe I need a better handle on annealing temperatures. I tried to punch the eye while the steel is still hot the way a smith uses a drift to punch the eye for a hammer, to no avail. Maybe it’s just a matter of practice and acquiring the knack.
I’m not sure. It’s not as simple as I thought it would be and maybe I should research this thing instead of figuring it out as I go along… you know… for a change².
Step two: When in doubt, go back to brass.
Oh brass, how I love thee. So ductile, so soft, so forgiving.


The punch popped right through the annealed brass like it’s supposed to and then I work-hardened it on the bench block. The whole thing went exactly in the manner in which the steel option did not.
Maybe I should have centered my research on the 15th or 14th centuries when they used more brass and less steel in everyday life.
The point of the exercise
And so we get, by the long way round, to the actual reason we’re doing this today. We’re here not because needles were on the docket but because we wanted to explore sharpening wires on a pinner’s bone.
How did the Tudor pinner hold their bone? Did the marks on the bone tell a tale of stone or file?
Holding
Kat Fernely suggested holding it squeezed between the knees. That seemed awkward to me and I wanted to see if maybe a shoemaker’s approach with the leather strap held under the heel and wrapped up the shin and over knee to hold it on the thigh. The only images we have of pinning show the pinner seated at a table (remember the images are German) so perhaps a holdfast?
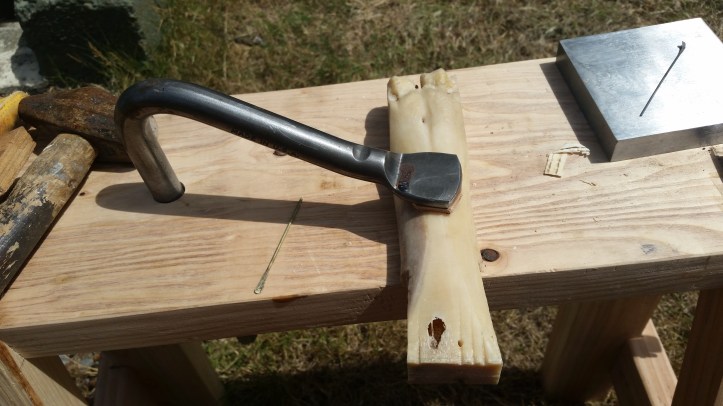
For today, I’m using a modern iteration of the holdfast, a metal L-shaped piece of steel which sits canted in a hold drilled through a bench/table. When struck with a hammer, the holdfast cants further and is held by friction and pins down anything under its leather-padded end.
I’m sure I’ll bore you to tears with more inforamtion about them when we get to joinery where we know they were employed.
Sharpening
I started out using a file because my earliest experiments have indicated strongly that the traditional belief that pins were, indeed, sharpened with files. The wire is drawn, cut, hardened, and held in the groove that best fits the gage of the wire.
This experiment left me no doubt that files were the usual tool, as the scratches left by even so fine a file as the ones I’ve chosen are obvious on the surface of the bone if you hold it at a good angle in the correct lighting.


If you would like to see these things illustrated more clearly, be sure to check out my first pass at making a pin.
So at the end of the day, I made a brass needle, failed a steel needle, and managed to duplicate the tool marks left by the tudor files. The hold fast worked beautifully, but I will still attempt the shoemaker’s strap and the stone when next we meet to make pins.
Until next time,
Scott
¹ I have friends who are blacksmiths and I swear that I can hear their teeth grinding from here.
² And now they laugh at my auto-didactic ass. It’s okay, I deserve it.

[…] In all my research, I can find no record of how the pinner held the bone steady as they filed their pins and/or needles. […]
LikeLike
[…] Cold forging is always an option whether you solder or not. Cut two hemispheres into opposing faces of sufficiently hard metal. I used a couple of bolts and seated the bottom one in the hardy hole of my Anvil-Shaped Object. […]
LikeLike
Try heating whatever you are using as an anvil. It will keep the pin hotter and more ductile. Also anneal at a dull red.
LikeLike