
Wired Again
When last we left the Worshipful Company of Wiredrawers, I spent a considerable amount of time examining them as an economics cautionary tale, but didn’t go much into the actual mechanics of drawing wire. The tools were too specialized, too expensive, and too hard to obtain at the time, so I explained how it worked and then moved on to the next thing on my list.
That was five years ago and the worm has turned. You can buy draw plates online from enough sources that they’re competing on price, making this a more manageable endeavor.
If you want a refresher on the sad, strange, history of the Pinners and Wiredrawers and why they’re a prime example of the weaknesses of the guild system, click that link at the top of the page. Last time, we talked history instead of craft; this time we’re talking craft instead of history.
Wire — like all metal objects — begins life as ore, which is melted into ingots, and as is the case of the brass we’re using here, melted together to form an alloy. Brass is a simple allow of copper and zinc, heavy on the copper. The resulting metal is a bright yellow color and has the ductility of the copper, tempered by zinc’s stiffness. According to historian Chris Caple 16th century brass had more zinc than most modern brass. It comes to the wire drawers in ingots (probably small ones) which are beaten and stretched and filed until they could begin drawing it through iron plates in a sequence of ever smaller holes.
Step One: Cut down a tree.
Okay, I’m kidding… sort of. You can always hold the draw plate in a vice if you want.
At our new house there’s a massive hedge and when I trimmed it back, I found a massive stump. Having a stump for these things is more aesthetically pleasing to me than working on even the sturdiest worktable. (Even if a sturdy worktable is a period-appropriate thing, I had a chainsaw handy anyway.)


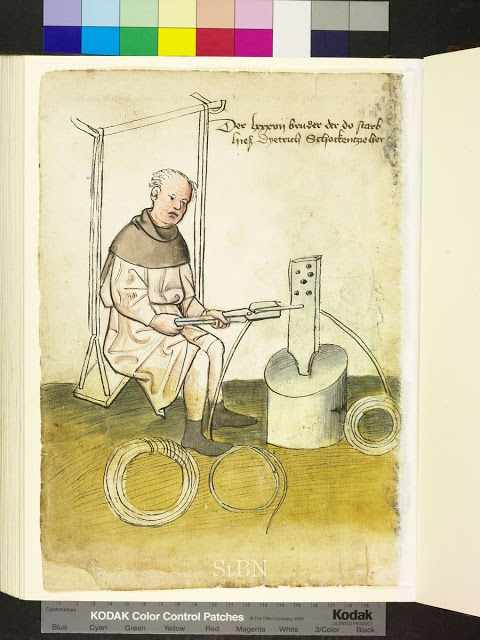
Drawplates have become so available, in fact, that I was able to find one that was almost identical to the one used by the monk in the hausbuch image.
Step Two: Draw, pardner
The hardest part is getting started.
A draw plate has a series of stepped holes, each smaller than the last. By ‘stepped’ I mean the openings on the back are larger than the hole in the front. Each pass stretches the wire and makes it longer, also hardening it with heat and pressure.
Forcing soft brass through that first hole was like trying to thread a spaghetti noodle through a keyhole. I tried beating it to a point, but that wasnt much better. After watching a few YouTube videos, I ended up filing it to a point until I could get it through the first hole far enoigh to grab with the pliers.
The rest is just patience and a bit of brute force. Stopping every couple of pulls to anneal the wire (soften it by heating it up) and run it through a block of wax to help lubricate the process.
Then, it’s back to file and force.


As I mentioned last time, Caple’s examination of period pins revealed a seam up the back, the remnant of the wiredrawers starting with a very flat piece of metal that was rolled and then drawn, worked until it formed wire.
Maybe I’ll try that next time.
-Scott
A little help from YouTube.

[…] Drawing Wire […]
LikeLike