If you haven’t checked out Kat Ferneley’s generous sharing of her 16th century pinners bones over on the facebook page, you really should.
If you’ve watched any of the dozens of forensics procedurals that have crowded the airwaves over the last decade (or read the books most of them were based upon) you’ll have heard a pathologist exclaim that a body was dismembered with such-and-such a saw, and they did or did not know what they were doing… and etcetera ad nauseum. (Sometimes literally.) The reason they could say these things with any certainty was by examining the tool marks and comparing them to a central database.
In a less criminal corner of the academy, these tool marks are similarly useful for antiquities
One of the ways we know as much as we know about the creation of furniture, jewelry, houses, and things like pinner’s bones is by examining and identifying the marks left by the tools used to create them.
On Kat’s bones, the large, obliquely intersecting gouges left by the teeth of the saw are obvious. Less obvious, but still visible, are the finer scratches left by the files that the pinners were using as they sharpened their pins.
This works on any surface and we will discuss it in more depth when we get back to the joinery portions of the experiment. Joinery historian Peter Follansbee charts the marks left by the makers of historical furniture, identifying the tools used to hew, plane, mark, and carve the surfaces. Examining furniture in museums and private collections has allowed him to chart the path his predecessors walked and to follow in their footsteps.
Note that even the smoothest-looking tabletop or steel surface has simply been overlain with fine enough scratches that we can no longer perceive them, but they’re there nevertheless. Every tool leaves its mark, even sand paper.
On our bones too we can verify our conclusions by comparing them to our own hand-made examples. When a handsaw passes through a piece of material, the teeth leave large and gently diagonal scratches on both sides of the kerf. Because the saw blade rocks a bit when it is driven by a hand, those scratches intersect here and there at oblique angles. When a bandsaw is used, those scratches are more parallel than the hand tool can make. (One cut in the following pictures was cut with a bandsaw, can you spot it*? Click to enlarge.)


We know that that the faces were not hewn with axes because of these marks. We also know that the faces were not filed into shape because files have a gentler, smoother, tool mark visible in the third image where the saw cut transitions to the top of the bone. See where the kerf marks vanish? That’s where the file took over.
These things are seriously annoying to photograph.
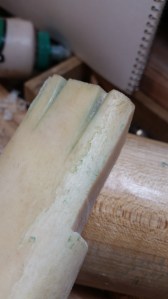
On the original bone from way back when, I found additional evidence of how it was utilized, as you can see in the image to the right.
Over time, the copper dust embedded in the pinning grooves oxidized and developed verdigris (copper carbonate), tinging the bone green. An historian examining this bone could make an educated guess about the copper content of the brass wire I used from that green smear.
It’s a handy reminder that we are, even now, leaving traces for those who follow us. Just because we live in the present, doesn’t mean we are not part of some future generation’s archeological record.
– Scott
*The bandsaw cut is the second image (The one with the glue bottle in the background). Conservators and experts can often easily spot fakes due to the regularity of the tool marks that are possible only with a machine-driven tool.

[…] Tool marks and the tools that made them […]
LikeLike