Take a look at your fingernails. If you have acrylic nails or otherwise can’t really regard fingernails of your own, take a look at someone else’s. Preferably someone who likes you. Ask permission to hold their hand; they’ll think it’s sweet and need never know you’re contemplating sticking them in hot sand and cutting them up with a sharp knife (my wife is a saint).
Contemplate how pliable a fingernail is. How clear or cloudy the structure of the nail is. How you can sometimes see the growth rings where the nail is growing back from some damage. How it goes from pliable to fractious once it expands beyond the nail bed. How it dries and cracks and fractures once cut away from the finger that bore it.
Your fingernails are made from protein filaments known as keratin. These same structures form your hair, an animal’s horns, the baleen of whales, and the feathers of a bird. This last part is why we’re staring at our fingernails. (You can stop now, by the way.)
That protein structure of feathers is both blessing and curse. Blessing because they can be clarified and hardened in predictable fashion, curse because it takes a bit of fiddly work to get the job done.
Quills
It is difficult to understand the structure of writing in any culture without delving into how the letterforms were first constructed. From the cuneiform incised into clay by the tip of a reed stylus to the feathery brush strokes of China, Korea, and Japan to the swoop and thread of western quill pens, every culture’s alphabet and how it is expressed has at its core the hand-held instrument that first created it.
In European cultures, that ur instrument is what Europeans reached for when they migrated beyond the easy reach of sturdy reeds, the quill pen.

If you think we left all this behind when we abandoned calligraphy, I hate to break it to you that we haven’t. Take a look at any traditional Western typeface and notice the thickened line of the downstrokes and how the line thins to a whisker on the diagonal or at the top of a circle. That’s the legacy of the square nib of a quill pen.
We’re going to make one.
Preparing feathers for writing
If you drop my copy of The Calligrapher’s Handbook it will fall open to an article written by Donald Jackson titled ‘Preparation of Quills and Reeds’. It is a much-thumbed article which I re-read before I start every time I start with a handful of feathers.
I’m going to explain it or you can watch the video at the bottom from the post, which will get you most of the way there, though his methodology is a little different from mine.
Needed:
- Flight feathers from a large bird, preferably goose or turkey. (See caveat in step one.) You want them to be as fresh as possible, but feathers from a craft store or fly-tying supplier will work. (None of this ostrich feather nonsense)
- Water
- Small crochet hook
- A pot
- Enough fine sand to cover the bottom of the pot to a depth of approximately 3 inches (7.5 cm)
- Scissors
- A small, sharp, fine-bladed, knife
- optional: A fingernail clipper
1. Choose your feathers
I can’t say this enough: ostrich plums, though popular in myth, are lousy pens. Don’t bother. You’re looking for goose or turkey flight feathers with clear, hollow, barrels. I’ve purchased them from craft stores, sporting goods stores (sold for fly tying), hunters, and people who raise birds for meat.
The shaft of the feather needs to be transluscent and devoid of any inner structure (which can look like styrofoam, see below). Loose, filmy, fibers inside are fine, but rigid structures make the feather useless for quill pens.


Caveat: Birds and the feathers they bear are protected by an overlapping series of laws that vary by jurisdiction. Do not go feather gathering from wild sources unless you area cutely aware of the laws that govern what you are doing and the possible consequences of putting a foot (or feather) wrong. For safety’s sake, I advise working with feathers from game birds, or those provided by a poultry farmer from livestock birds. Turkey or goose flight feathers are ideal for this anyway.
2. Soak
Use a sharp knife to cut the tip off the barrel of your feather and strip the barbs back to above the water line. You can strip them entirely or just a little, it’s up to you.
Once they are clipped and stripped, bundle your quills together and put the cut tips in water for about 12 hours. (note: fresh feathers need less time to hydrate.) If you use a tall beaker for this, you can restrain the feather’s tendency to float using rubber bands to restrain them.

3. Clean the barrel
Use your fine crochet hook (or make a small hook out of fine wire) to clean out any filmy inner structure from the shaft of the feather. The barrel should be empty before you progress to heating and curing.
Take care not to scratch the inside of the barrel.

4. Heat your sand
While you’re allowing your feathers to dry by spreading them out on a towel somewhere your kittens can’t get to them (ahem) put your sand in your pot. I advise getting a cheap pot from a thrift store for this and just making it your dedicated feather pot.
If you do a lot of this or if you are uncertain in the realm of heat control, you can also use an electric skillet. The thermostat on those things dials this in very neatly, but I don’t bother.
(You will note that I’m doing this outside. It doesn’t stink overmuch, so you can do this on your stove if you want to, but we had a pretty day so I wanted to be outside.)
Very fine sand is called for and will make things easier.
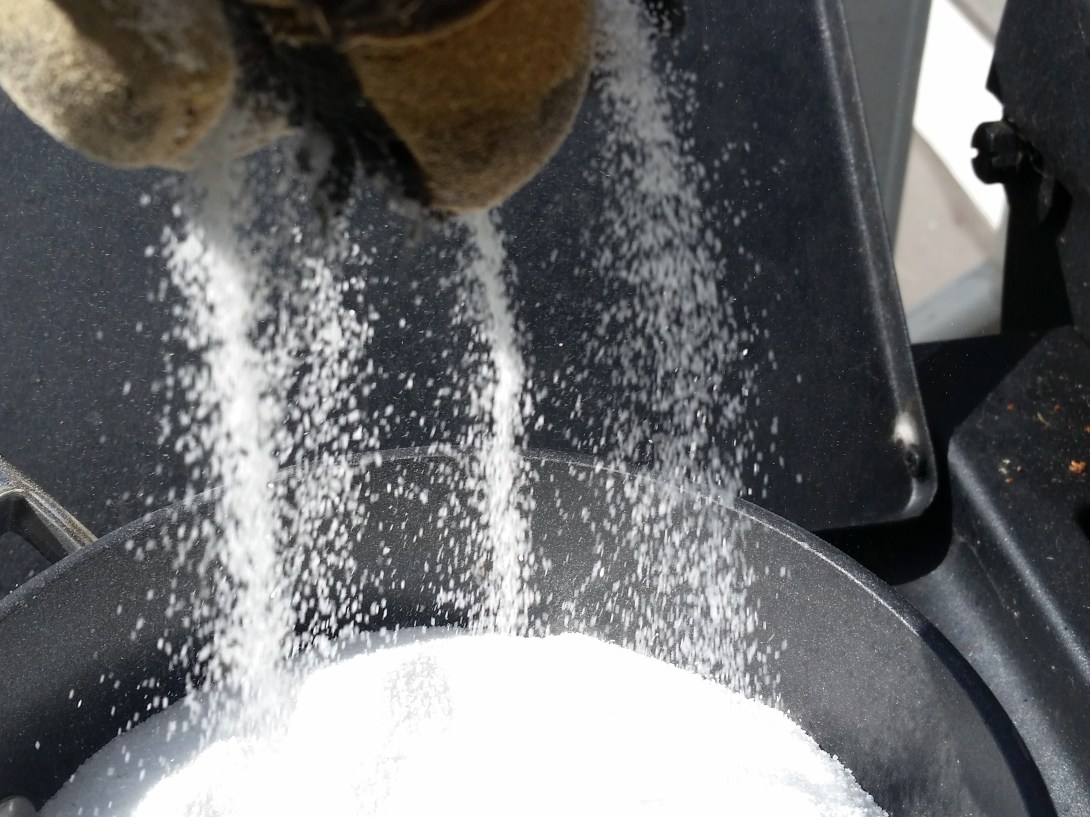
Obligatory Safety Warning: Hot sand is hot. Take precautions that you don’t burn yourself.
5. Cure
Holding the feather in one hand (well back from the tip) and use the spoon that I forgot to write into the materials list to sprinkle hot sand into the inside of the barrel of the feather. This will help equalize the temperature inside and out. Then plunge the first two inches of the shaft into the sand for a minute or two.
Don’t take your eyes off it. You’re watching for the barrel to get more translucent without going over into milky or brown (burning). In the following image, the one on the top/left went to far and the one on the bottom/right is just right. A fine line of time and heat divides them.

This takes practice. Go slow. Do one feather at a time until you get the hang of it.
Note: Fresh feathers, especially turkey feathers, might still retain an outer membrane that could blister and peel when it’s heated. That’s okay as long as the material of the shaft itself doesn’t turn brown or get crispy.
6. Scrape
There’s no photo of this because it doesn’t look like much. Use the back of your knife or hold your knife at a 90 degree angle to carefully scrape the outer membrane off the cured shaft.
This is when you should also pull off most of the remaining barbs to clear them away from your hand. You can leave a little flag at the top like I do or you can pull them off completely as was more common in the period.
7. Cut the nib
The business end of the quill is cut with a knife. Just about any knife will do. You can use an X-acto style craft knife or a small chip carving knife; both are cheaper and easier to get hold of in the modern marketplace than a proper pen knife. Jackson gives detailed instructions for modifying a chip carving knife to meet his preferred style of quill cutting. I own an antique knife (pictured below, foreground) and they’re easy to come by on eBay. I love it and highly recommend them as long as you know how to maintain an edge.

Obligatory Safety Warning: Sharp knives are sharp. If your skin meets the knife, your skin will lose. Don’t let that happen.
Cut the tip to look… well… like a pen, I suppose.
For a modern mind, the best way to think of it is to imagine you’re copying a metal nib of a calligraphy pen (even though in reality that technological progression ran the other direction). Cut away the bottom of the feather’s shaft to form a chiseled tip with a slit down the center.
Pick a sacrificial feather and practice these cuts until you’ve got it. Please keep your finger out of the way of the blade or wear a protective glove to keep from cutting yourself.

Above is an older quill of mine alongside two scribbles illustrating how I cut it viewed from the top and from the side. Below is the same pen held pressed against a bit of scribbling paper which I use to test newly-cut nibs.

If you search “Quill pen” on Wikimedia Commons, you’ll find a load of images of cut quills, giving you an idea of the nuances available in terms of personal preference and aesthetics. You can cut them to fine points or fat chisels as it suits your needs.
A fingernail clipper is an awesome non-period tool for refining the point, by the way. They’re essentially fingernails after all.
Troubleshooting
- If the feather warps or chars in the sand, it is too hot, back off the heat and wait for the sand to shed some heat.
- If nothing happens at all, put a lid on the sand pot and wait. Remember: sand is a natural heat sink and it takes quite awhile for it to absorb enough heat or shed enough heat to make a difference through the whole body of the sandpot.
- Blobs of ink, not flowing? Cut away a bit more of the underside of the pen or don’t dip as far into the ink (we’ll discuss that more in a future post).
More later as always,
~ Scott
The following video was made by someone else, but explains quill pens pretty well.
