
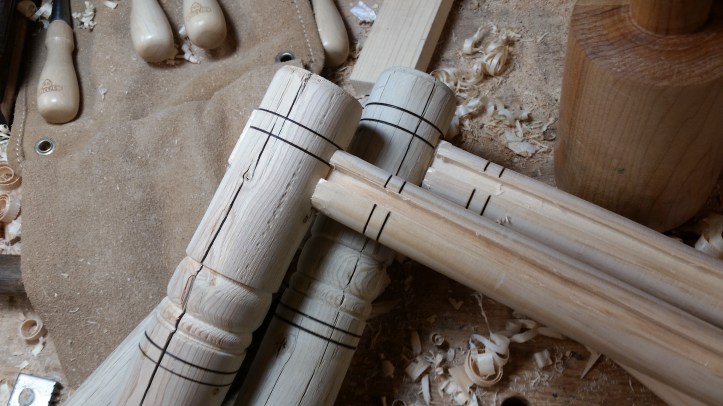
Okay, we have our rails, legs, and stretchers cut and turned and sitting on the bench. Each rail will have a turned round tenon on one end and a square block left on the other with one cheek removed. They’re locked into some sort of work holding scenario (I suggest a wagon/tail vise) and you’ve sharpened up your plough plane and are ready to get groovy.
Groove is in the heart
Because we wisely left the end of our rail squared-off and left the bottom cheek intact, our rail is going to sit tight and square against our bench top without a bunch of v-blocks or other paraphernalia to keep it from rolling. Also, if you wedge a little here and there, you should be able to have your plane’s fence register against the nice, flat, bench top, keeping your groove nice, straight, and square.

All things being equal though, plowing on a round surface is frikking annoying on a level that I had never quite encountered. It took me awhile to get the hang of it, and it will you too. Just keep at it.
Turn the other cheek
Once your seat grooves are ploughed, you can remove the other cheek from your tenon and start contemplating the mortises.

The rectangular mortise is the easy part and it comes first. Use the squared tenon end of your rail to size the mortise it’s going to fill. Patrick Follansbee marks these while the leg is on the lathe because he’s made dozens of these things and is just generally a badass. I am not a badass and this is my first one, so I very carefully measured, re-measured, and marked my tenons with a pencil so I could erase when I inevitably messed it up.
In that Woodwright’s Shop episode where they make one of these, Follansbee says he doesn’t pay much attention to grain orientation when laying these out, nor does he think the joiners of old did so either. In part this is due to that second mortise that’s going to be crisscrossing at an acute angle, which would effectively nullify any additional strength gained by chopping into the face of the grain. Do as you wish, I did my best to ignore grain direction and didn’t see any harms arise from doing so.
This is a through mortise, meaning it goes all the way through the leg rather than stopping midway. Chop out the mortises using your preferred method. Because I was trained in the 20th century, I like to drill out the bulk of the waste and then clean up with a paring chisel. Or you can chop them out entirely by hand. Either way, the finished product should look something like this.

 Now we’re ready for the most annoying part and the part where I went astray the first time I tried this…
Working the angles
Crack your grade school geometry books and you’ll find the following: The sum of the interior angles of a triangle will always be 180 degrees.
So the walls of any equilateral triangle (like our stool) will meet at 60 degrees. And if we deviate from that angle, the angels will weep, our mothers will cry out in vain for our lost geometries, and the lamentations of the ghosts of our forefathers will really start to get on our nerves after a while.
This is where I screwed up on that first try at this. A deviation of one degree will, add up quickly, at the rate of something like 1/4 inch every foot (give or take). In that first stool, I winged it a bit, and over the 19 inch length of my uncut rail, I had a 2° deviation of 1/2 inch. When your mortise itself is only 1/2 inch, you missed the mortise by the width of the mortise. That’s not recoverable.
Buy a protractor; you’ll be glad you did.
Follansbee shows the round tenon being drilled with the rectangular tenon in place. That makes a lot of sense and reduces the number of steps. I did it that way the first time, but not this time. This time I carefully set up the angle for drilling the round mortise and then removed the rectangular tenon. Then I drilled my hole, returned the rectangular tenon to its mortise, and drilled through the tenon.

It worked for me, but like I said, drilling with it in place makes a lot of sense if you’re willing to deal with the interference of the in-place rail sticking up inside the throw of your brace.
Remember that the groove is on the inside of the triangle. If you do it backwards, you’ll need to start over.
Or you could use a drill press. I won’t tell.


Next time, we’ll make the seat, drill out the rails, and figure out how to assemble the thing without help.
~ Scott
See Part One for the “Works Cited” links
